
Package Upload
Uploading to Cloudsmith is simple. We provide three ways to push your packages/files/assets into your repositories:
- Upload via the package-specific native CLI / tools (where supported).
- Upload via the API using tools/integrations (such as the official Cloudsmith CLI).
- Upload directly via the website.
In the following examples:
| Identifier | Description |
|---|---|
| OWNER | Your Cloudsmith account name or organization name (namespace) |
| REPOSITORY | Your Cloudsmith Repository name (also called "slug") |
| USERNAME | Your Cloudsmith username |
| PASSWORD | Your Cloudsmith password |
| API-KEY | Your Cloudsmith API Key |
| PACKAGE_NAME | The name of your package |
| PACKAGE_VERSION | The version number of your package |
| FORMAT | The package formats e.g. Nuget, Cargo, Raw |
| DISTRO | Linux distribution |
Upload via Native Tools
Documentation for package-specific native CLI and tooling is available on the website within each repository. Click the Push/Pull Packages button and select the desired package format.

Native CLI / API / Tools tab
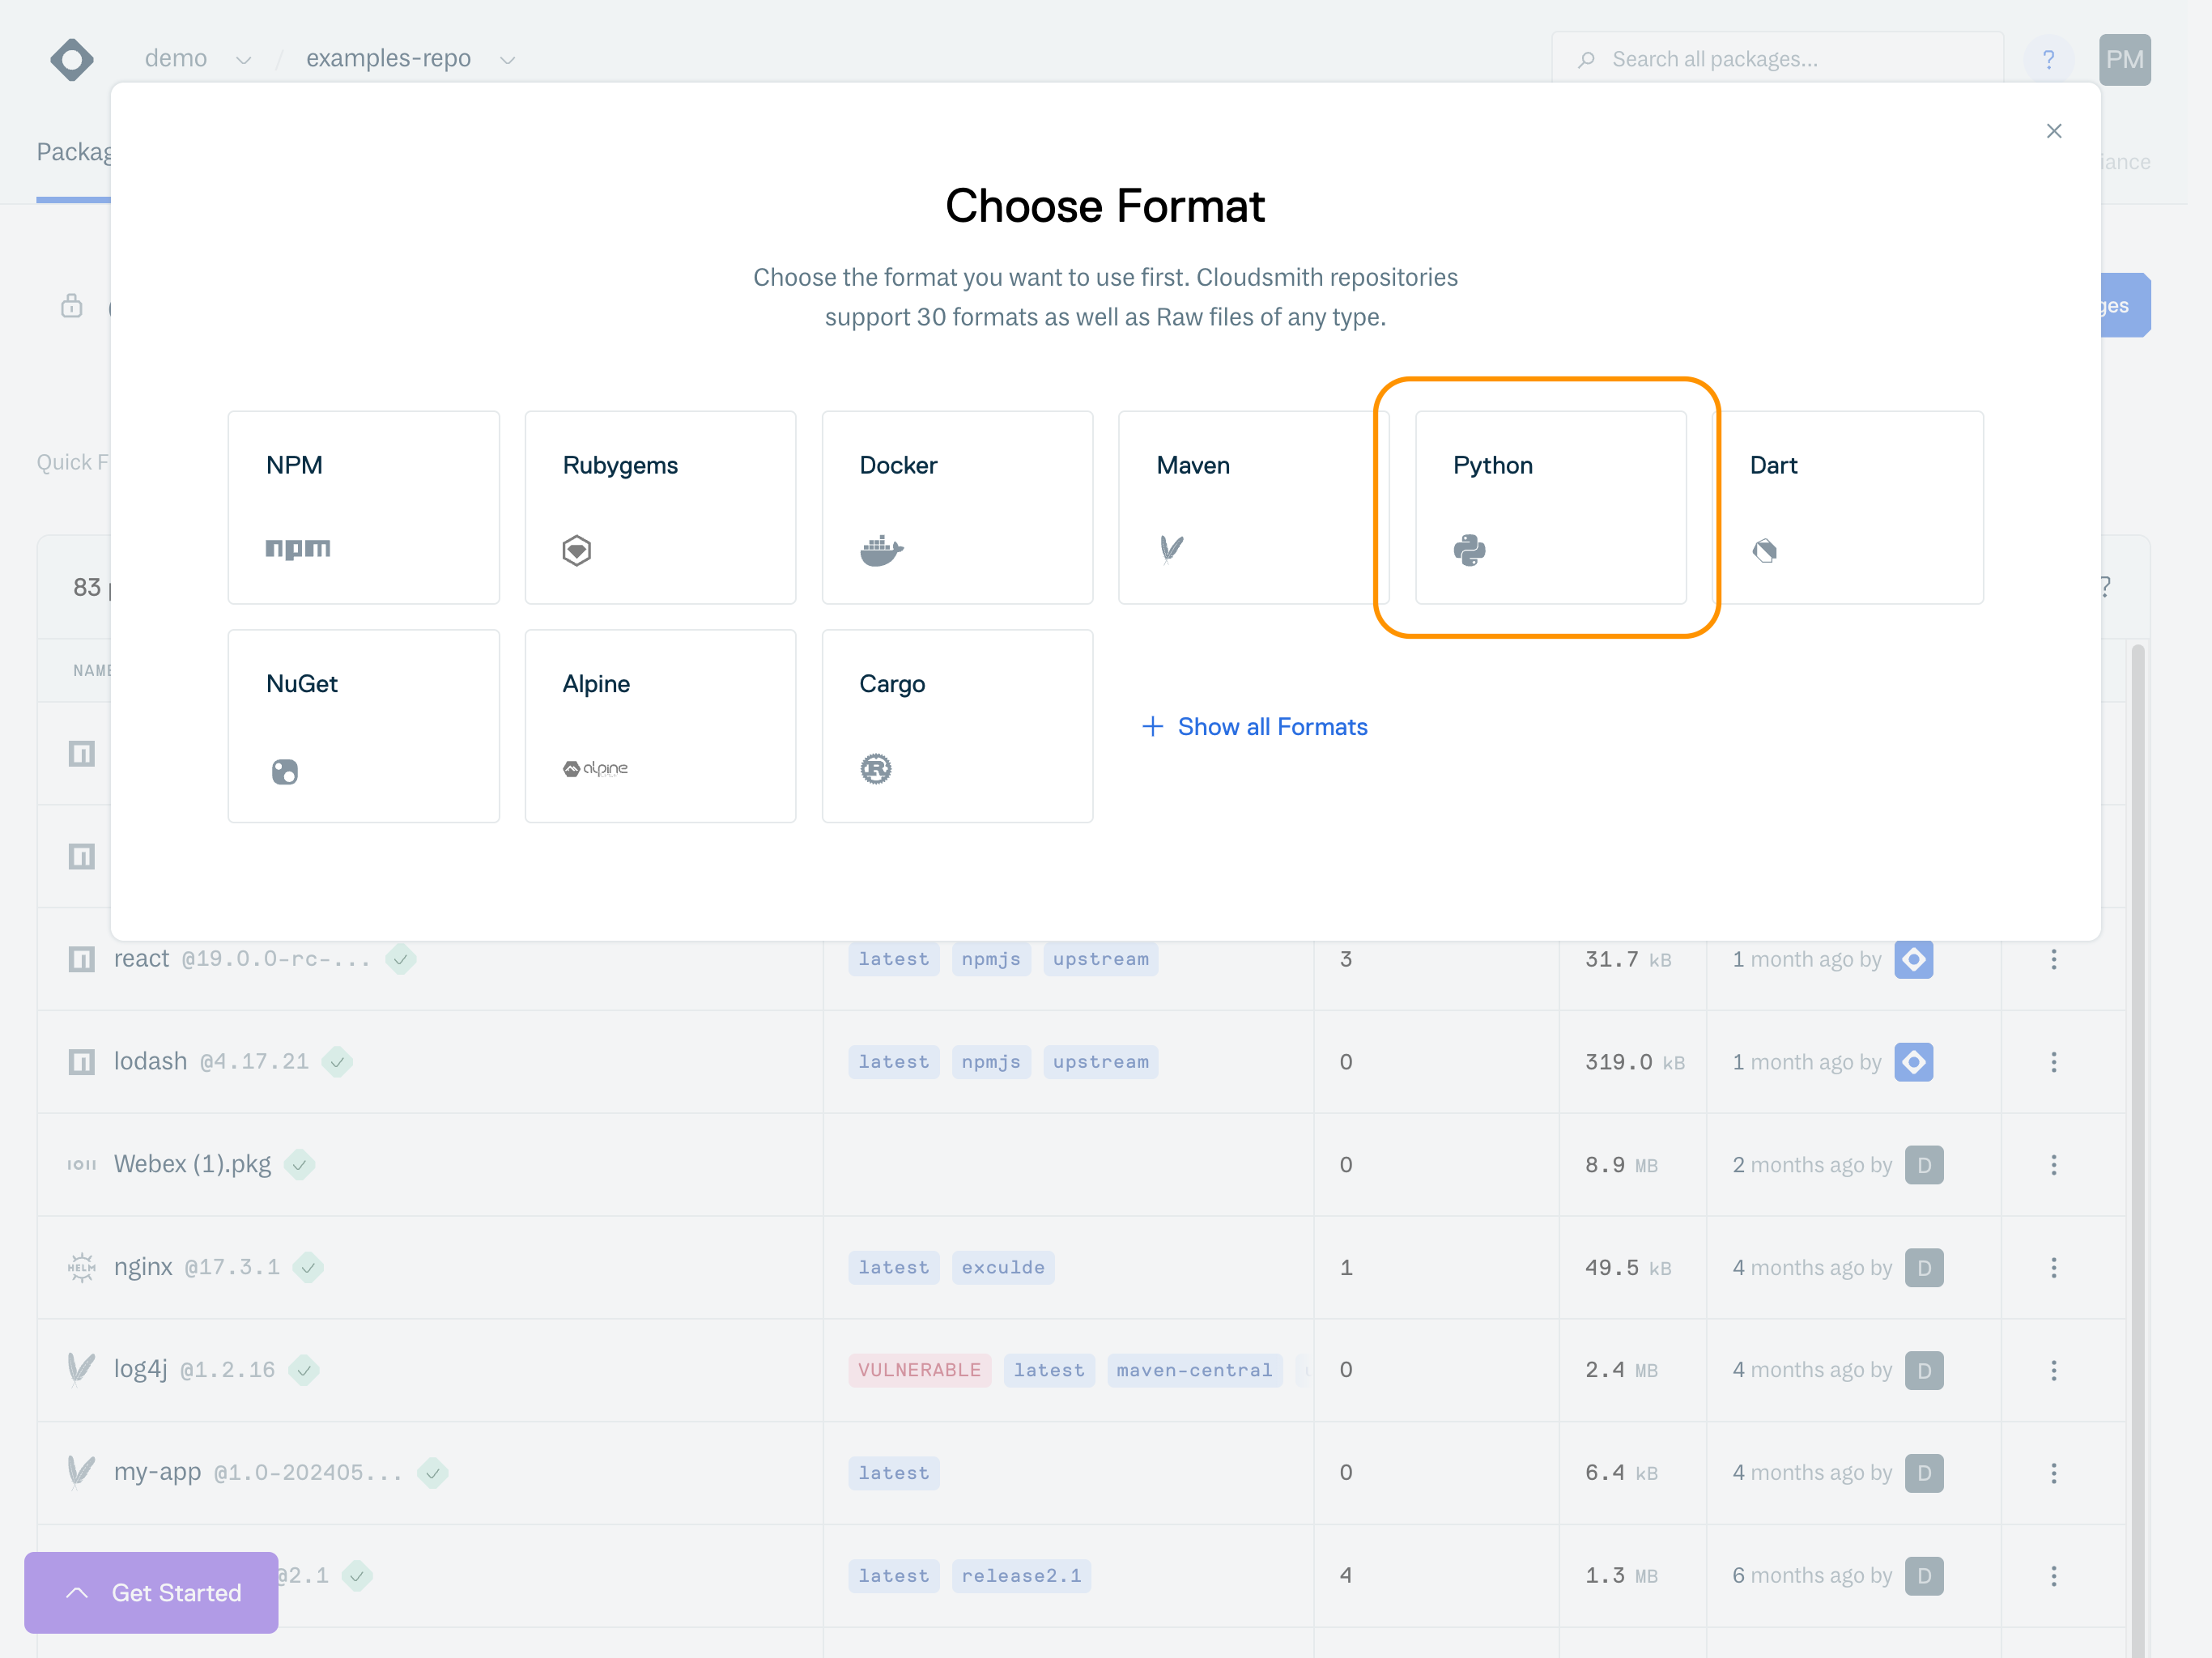
Select your desired package format
Native instructions for your package format
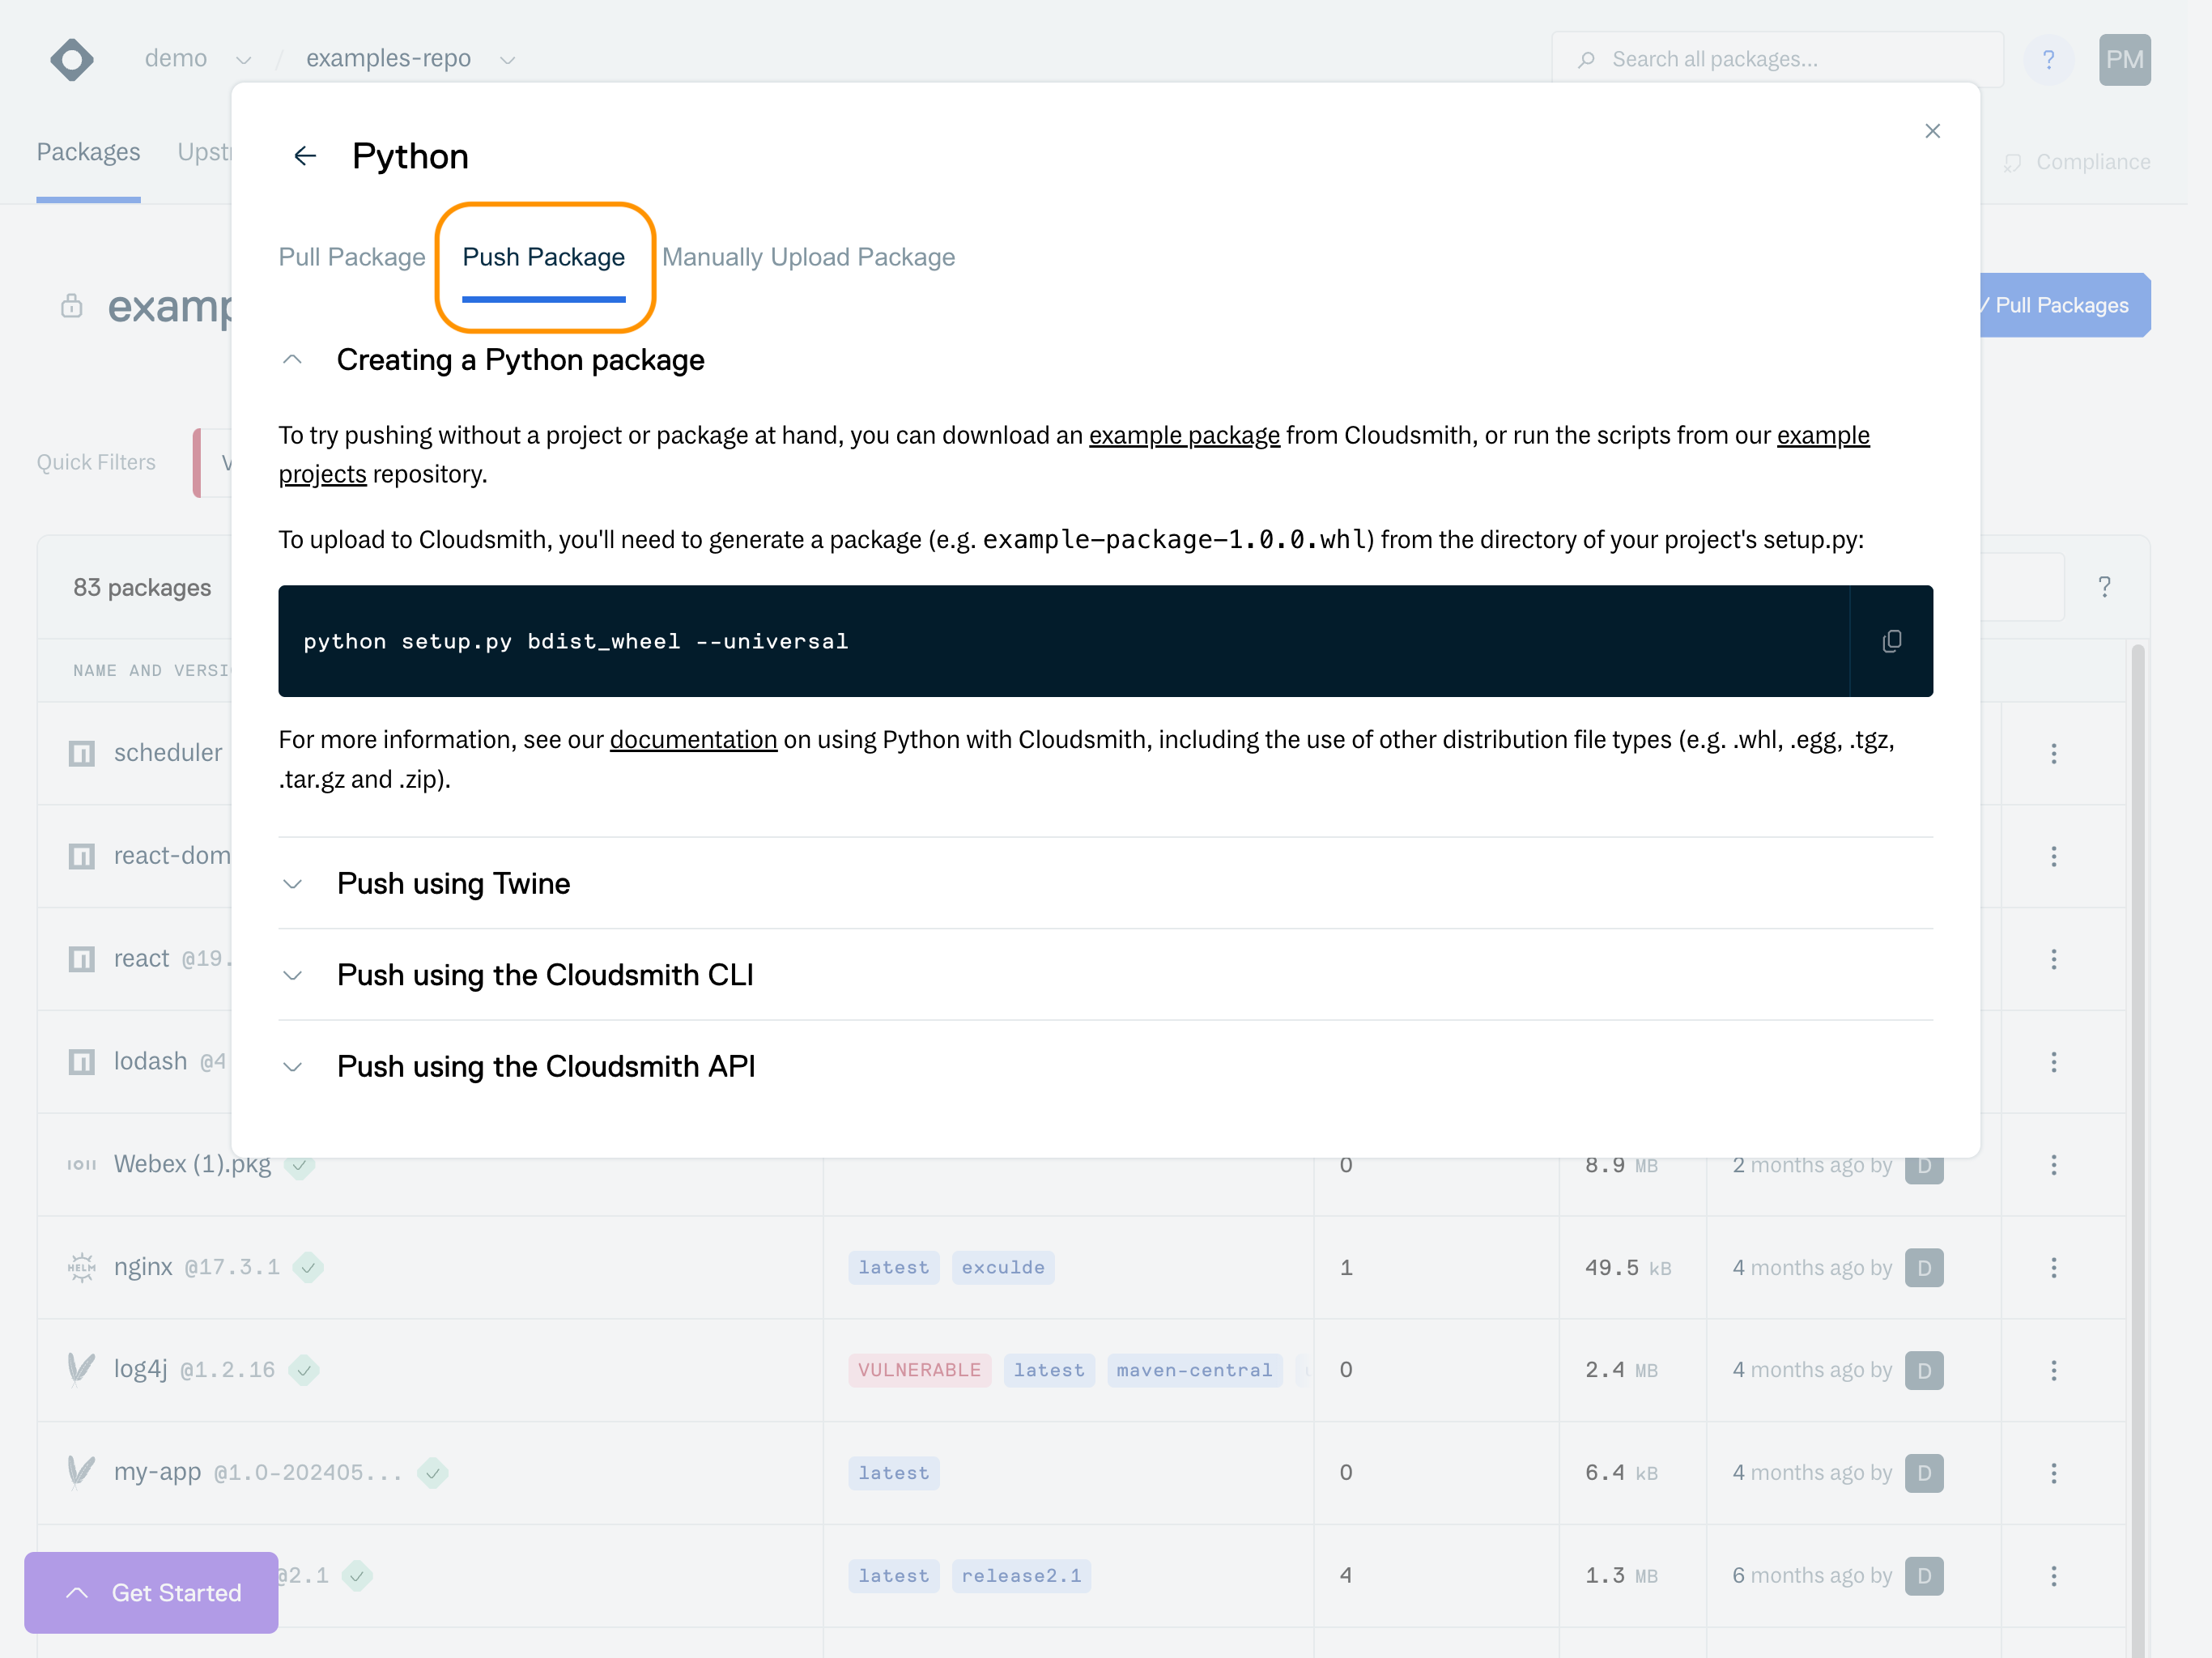
Upload via Cloudsmith CLI
To upload a package via the Cloudsmith CLI, use the cloudsmith push command:
cloudsmith push <format> OWNER/REPOSITORY <package_file>For example:

cloudsmith push CLI example
Some formats may have additional parameters that need to specified (i.e distribution and version for Debian packages). Further format-specific examples of Cloudsmith CLI commands are available in the CLI documentation
Context-specific documentation, including copy and paste commands (with the owner/repository already configured) for the Cloudsmith CLI, is available within each repository on the Cloudsmith website.
You may also add optional tags to a package when uploading. For example, to upload a Debian package with optional tags, you add the --tags parameter to the push command:
cloudsmith push deb OWNER/REPOSITORY/DISTRO/VERSION PACKAGE-NAME.deb --tags TAG1,TAG2 We also support the optional functionality to tag packages with pre-release components as latest. By default this functionality is turned on, however can be turned off in the main settings of a repository with the setting Apply Latest Tag for Pre-Release Versions?.
Please see Package Tags for more information on package tagging
Upload via Cloudsmith API
Uploading a package to Cloudsmith via the URL is a 2 step process
- A PUT req against the upload URL:
https://upload.cloudsmith.io/OWNER/REPOSITORY/PACKAGE_NAMEThe response to this PUT req gives you an identifier that you will need for the next stage.
Single-use IdentifierThe identifier returned from the PUT request is for single-use only. You must make a new PUT request to get a new identifier for each file you wish to upload.
- A POST req to create package endpoint
https://api-prd.cloudsmith.io/v1/packages/OWNER/REPOSITORY/upload/FORMAT/Postman is an application used for API testing that we can use to illustrate using the API to upload a raw package. You can install Postman here
Lets see how you can upload a raw package using Postman:
PUT req against the upload URL using Postman
- Populate Postman with the PUT request URL (see the image below, highlighted 1)
https://upload.cloudsmith.io/OWNER/REPOSITORY/PACKAGE_NAME- Switch to the ‘Authorization’ tab and populate your credentials with either Basic Auth or your API Key
- Switch to the ‘Body’ tab and upload the file as a binary.
- Press send and receive the response.
- Read the identifier (single-use) from the response to use in the next stage (see the image below, highlighted 5)

Send PUT req to Cloudsmith using Postman (step 1 of 2 to upload a package)
POST Raw package using Postman
- Populate Postman with the POST request (see the image below, highlighted 1):
https://api-prd.cloudsmith.io/v1/packages/OWNER/REPOSITORY/upload/raw/- Select the ‘Body’ tab and populate it with your JSON:
{"package_file": "IDENTIFIER", "name": "test-package", "description": "Everything about packaging files.", "summary": "My Package File", "version": "1.0"}NOTE: the package_file value should be populated with the identifier from the PUT response above.
- Switch to the ‘Authorization’ tab and populate your credentials with either Basic Auth or your API Key
4. Press send to upload the raw package.

Send POST req to Cloudsmith using Postman (step 2 of 2 to upload a package )
Upload via Website UI
Select the repository that you would like to upload into and select Push/Pull Packages.

Push/Pull Packages
Select your desired package format.

Package format selection in the Push/Pull Packages menu

Package upload form
Click the Upload File button, and find the package you want to upload. Then click the blue update button. You may need to add additional information, depending on the package format you are uploading.
Once you click on the Upload button, the synchronisation process will begin. After a few seconds your package will be visible in your repository, then available for download.
Frequently Asked Questions
Q. Is there a maximum file size for upload?
Yes, the current maximum file size is 5GB.
Q. While republishing a package with the same version via the Cloudsmith CLI, I get a message - "Republishing was not enabled for this package". Is there any way to "Allow Republishing" for packages ?
There are two ways to achieve this:
-
When uploading you can add a
--republishflag to the CLI command to enable republishing. -
You can also set it to be republish enabled by default for all uploads in the settings for your repository (configured via the web app, under each repository's "Miscellaneous Settings"):

Package Republish Setting
Q. Is there a delay until a package is fully available? Our build pipeline publishes a new version of libraries each git commit and triggers changes on the git repository of the applications that are users of such library. Between the time frame of publishing and triggering a new build (that happens only after the publish has finished), we have some build failures. But on repetition they pass.
Processing for uploads happens asynchronously on Cloudsmith, so yes there's a small delay between pushing an artifact and it being available. Usually, this is around one minute, but can be longer if the system is under extreme load or if your account is uploading many artifacts in parallel.
There are a few options to consider to get around this today that are commonly utilised (and we're thinking of others):
(a) Add a wait (e.g. 1 minute) and retry mechanism to your jobs, to make them wait for the synchronisation; or
(b) Use the repository webhooks to ping your build system to continue after the package has synced; or
(c) Use the cloudsmith-cli (via cloudsmith push) to upload packages, since it has wait functionality built into it.
Q. If we are pushing from CI (multiple branches) - can the tags like "latest" be set to allow us to set the branch or is the expectation that we would encode the branch in the version? e.g.1.0.0+bugfix
Tags are currently created by us automatically, and they wouldn't influence how a tool like pip can retrieve packages. So the way to go here would be to encode the information as Metadata into the version.
Updated 6 months ago