
Setup GitHub Actions to authenticate to Cloudsmith using OIDC
Our workflow using GitHub Actions and Cloudsmith with OIDC will push a package to Cloudsmith from Github Actions using OIDC to authenticate.
How does OIDC work with Github Actions and Cloudsmith?
The following diagram gives an overview of how GitHub's OIDC provider integrates with your workflows and Cloudsmith:
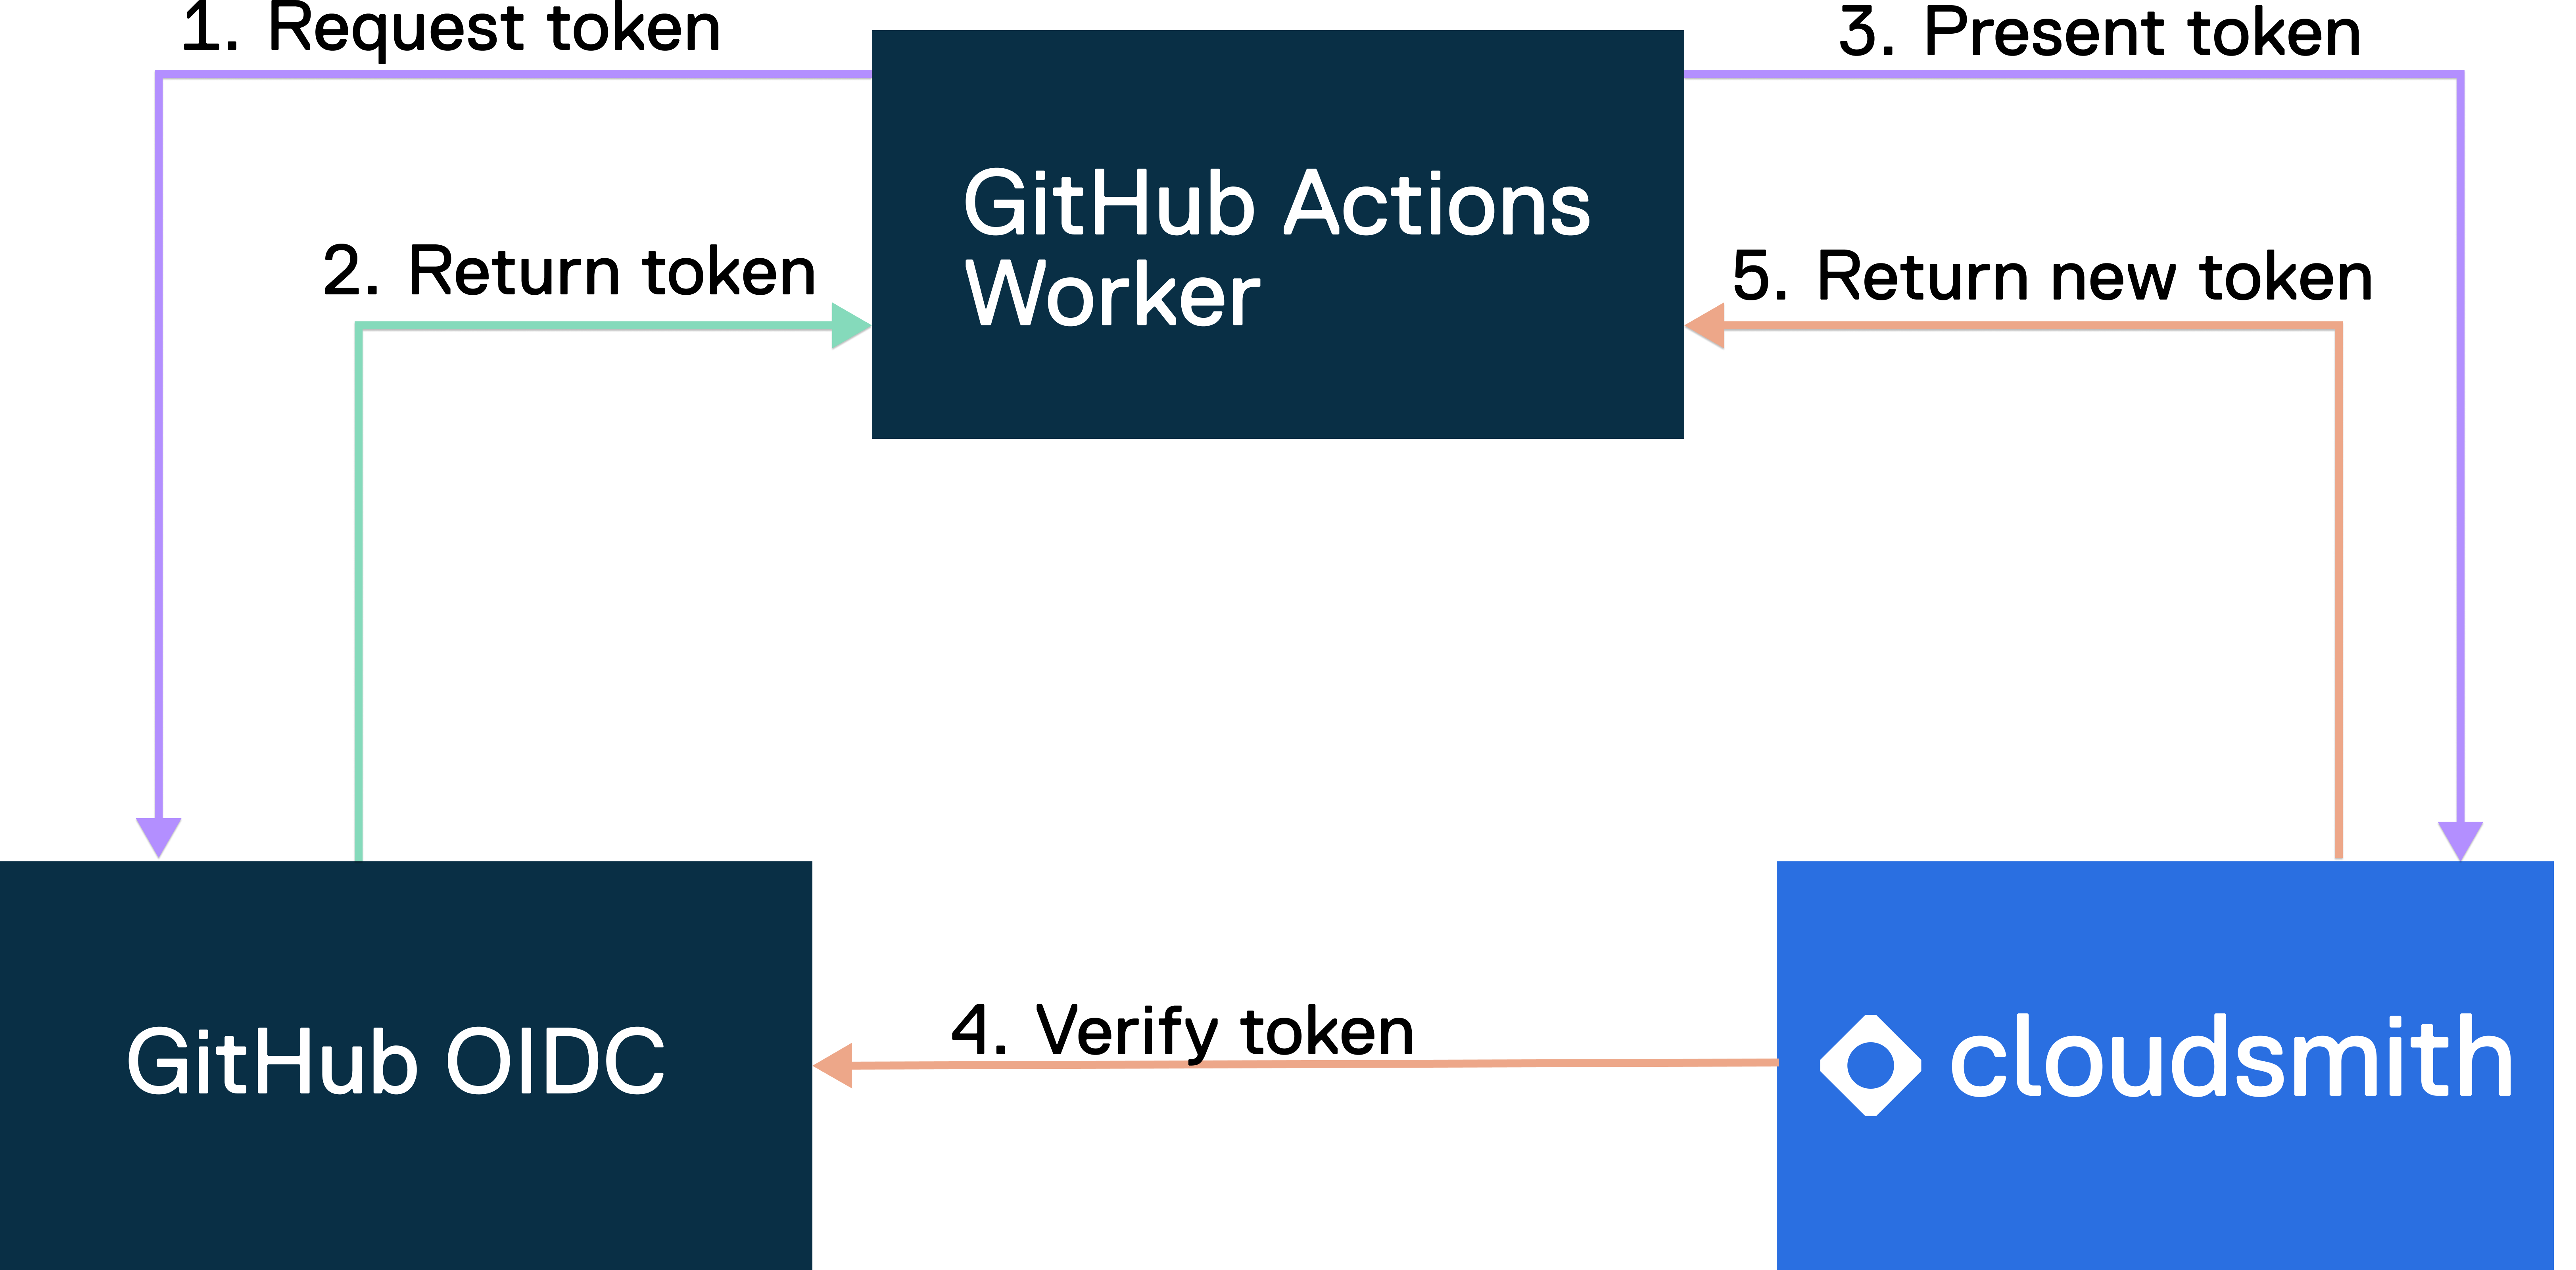
OIDC flow overview
- Request token: GitHub Actions Worker initiates the workflow by requesting a token from the GitHub OIDC service to authenticate with Cloudsmith.
- Return token: GitHub OIDC service receives the token request. After verification and validation, it generates a JWT token. The GitHub OIDC service and the GitHub Actions Worker have implicit trust, allowing for this token exchange.
- Present token: GitHub Actions Worker presents a JWT token to Cloudsmith for access to resources.
- Verify token: Cloudsmith verifies the JWT token with the GitHub OIDC service to ensure its authenticity and validity. This step includes verifying claims.
- Return new token: Upon successful validation, Cloudsmith issues a short-lived access token to the GitHub Actions Worker, granting access to Cloudsmith's resources for around 90 mins to cover the duration of the job.
Step-by-Step Guide
Follow the steps below for the Cloudsmith and GitHub Actions OIDC Setup:
1. Create a Service Account in Cloudsmith and set Access Controls
- Service accounts are a specific type of account that allows you to create a Cloudsmith API Key not tied to a specific user.
- Navigate to the Services section on your Cloudsmith workspace's accounts page and click "Create Service".
- In the form, give your Service a name and optionally add a description and choose any teams in your workspace that you wish to add the service to.
- Configure the repository access controls to allow the Service Account to push packages to Cloudsmith.
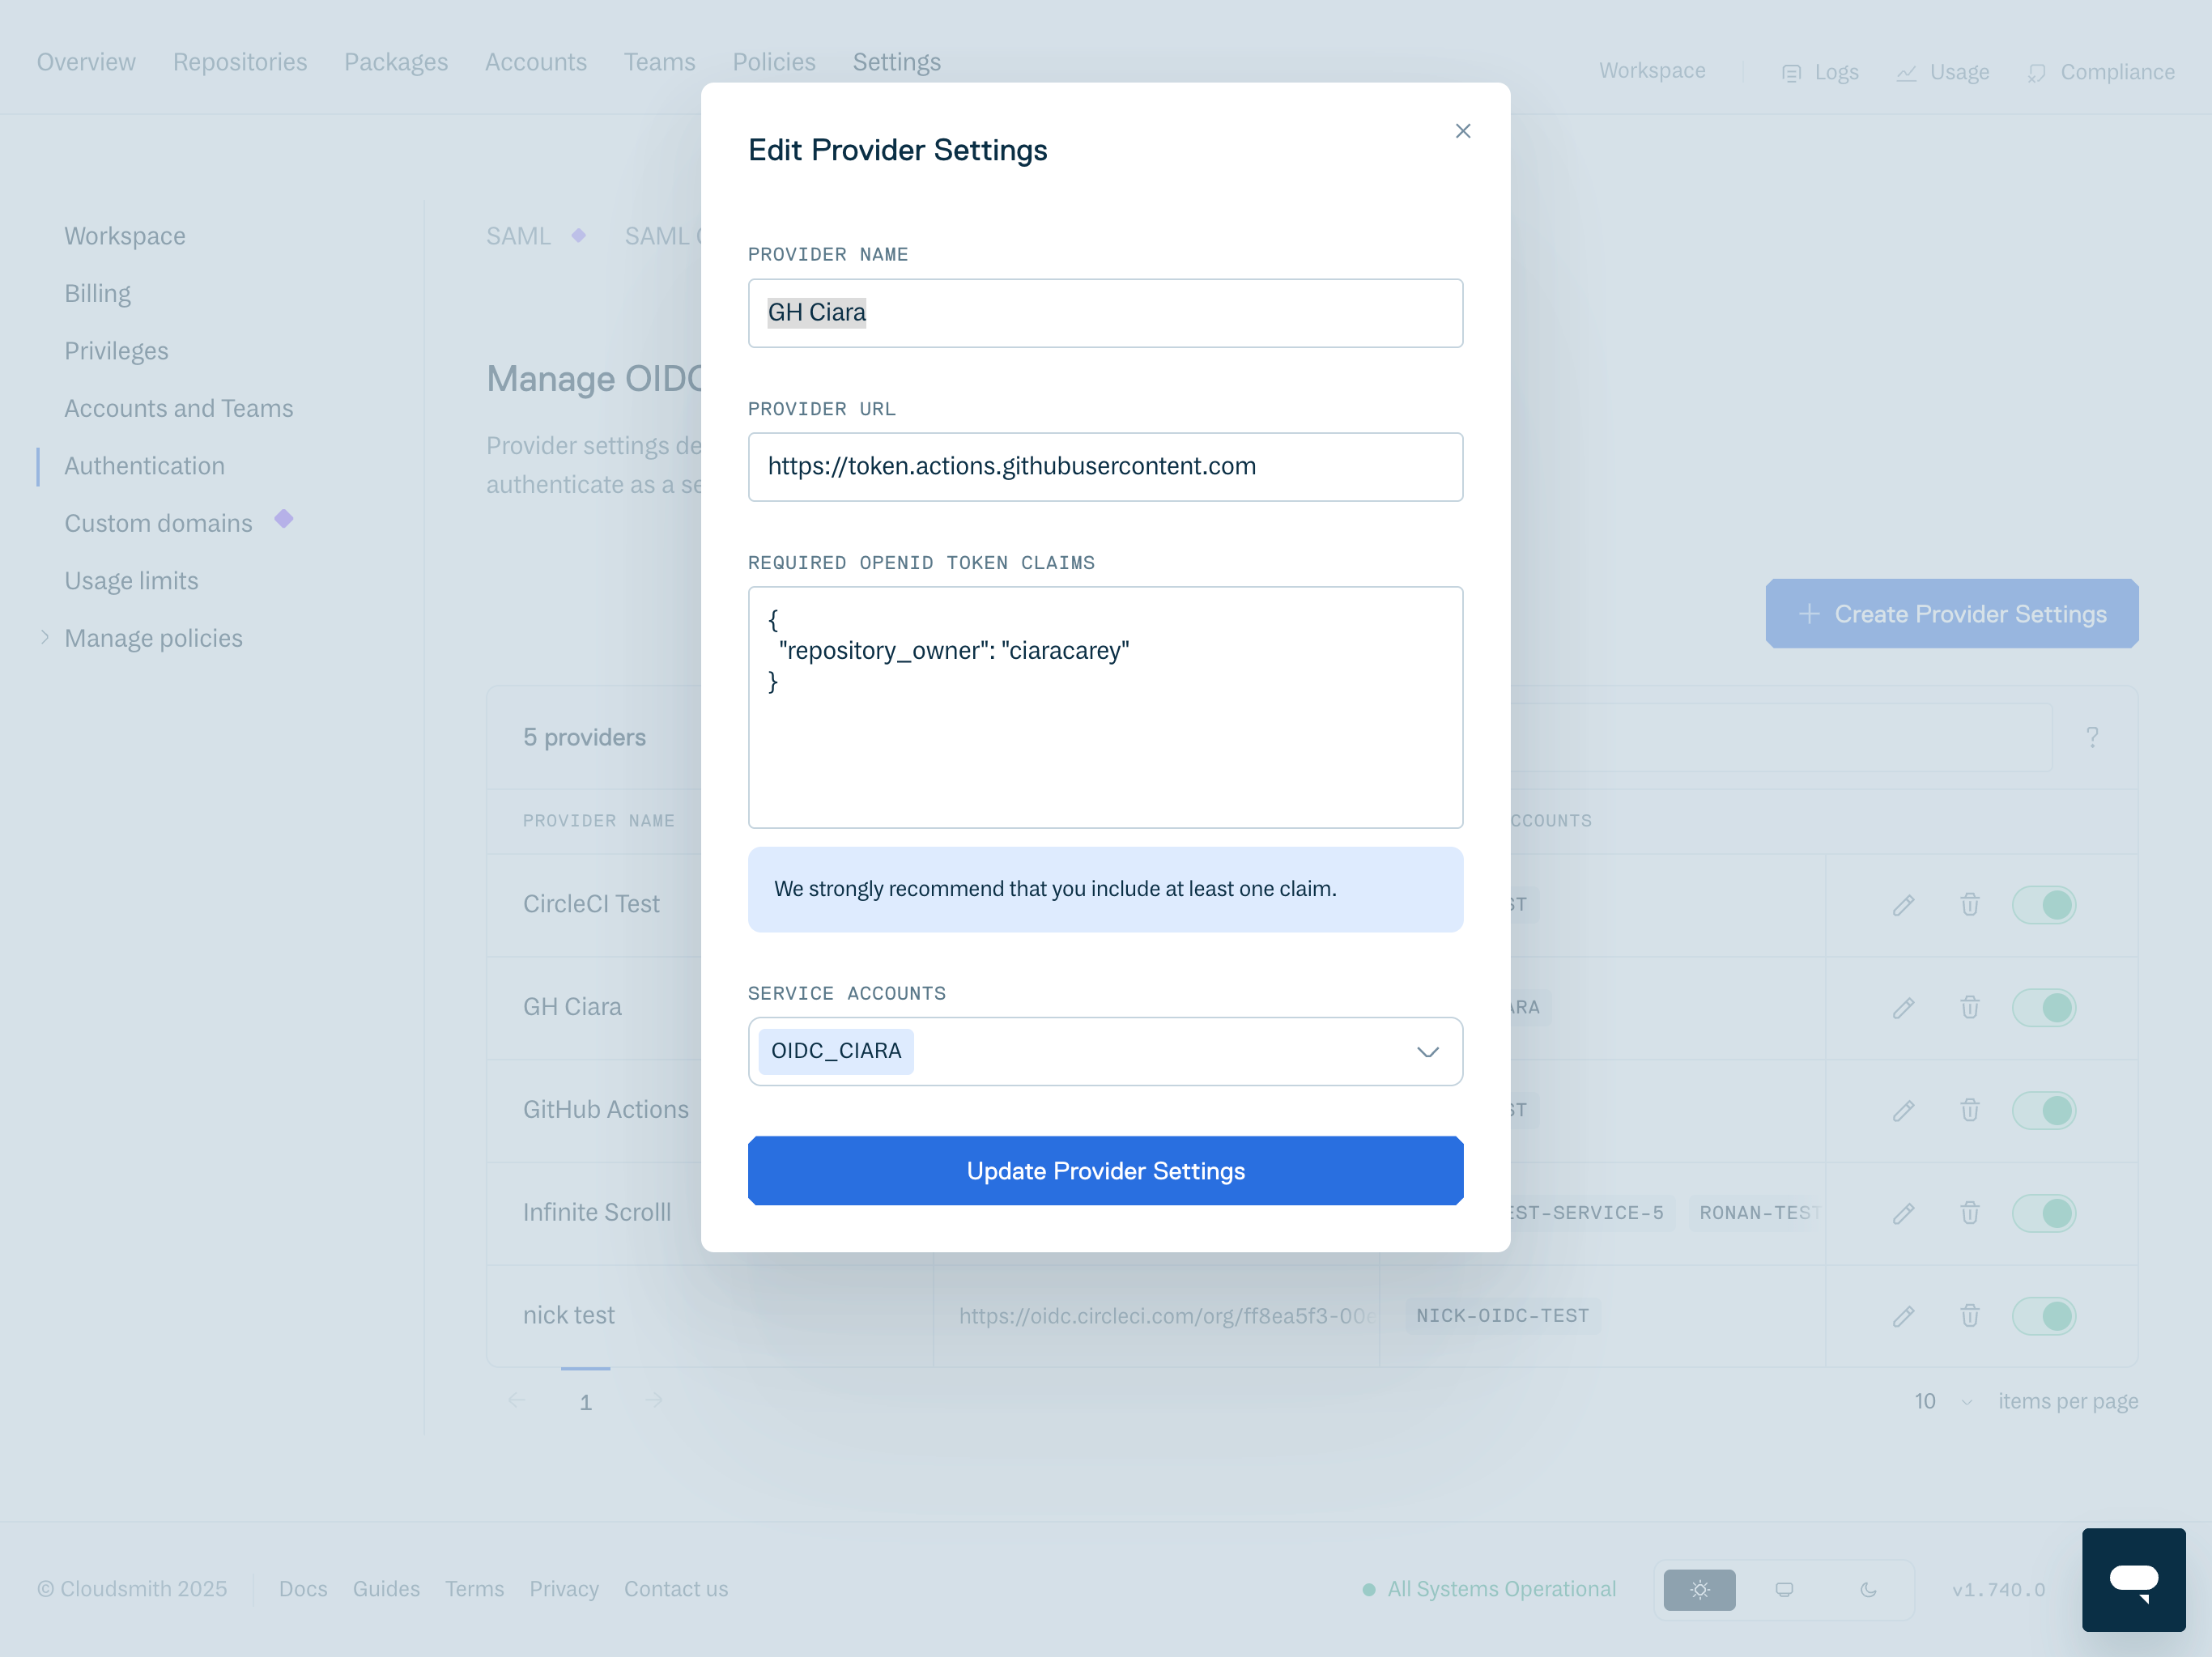
2. Configure GitHub OIDC in Cloudsmith
Role requirementManager or Owner role required in your Cloudsmith workspace to configure OIDC Provider Settings.
-
Navigate to the OIDC Provider Settings at: https://app.cloudsmith.com/{WORKSPACE}/settings/authentication/openid
-
Click "Create" to open the Edit Provider Settings form.
-
Fill in the OIDC form:
-
Provider Name: set a unique name for the provider.
-
Provider URL: This URL must precisely match the iss (issuer) claim from the OIDC token generated by your GitHub environment:
- Standard GitHub.com: The URL is typically
https://token.actions.githubusercontent.com. - GitHub Enterprise Cloud: The URL will include your enterprise name, like
https://token.actions.githubusercontent.com/YOUR_ENTERPRISE_NAME.
- Standard GitHub.com: The URL is typically
-
Required OpenID Token Claims: To validate the token, the cloud provider checks if the OIDC token's subject and other claims are a match for the conditions that were preconfigured on the cloud role's OIDC trust definition.
-
Service Accounts: Select the service accounts that can be authenticated with this provider and claim combination.
ClaimsWe strongly encourage you to set at least one claim. Without claims, any GitHub Action that knows the service account slug could gain access. In the example, we use
repository_owner. -
3. Update your GitHub Actions for OIDC
Cloudsmith provides a native GitHub action integration, that avoids a manual exchange of tokens.
- Add permissions: In your GitHub Actions YAML file, add the permissions block to allow the workflow to request an OIDC token.
permissions:
  id-token: write # Required for requesting the JWT
contents: read # Required for actions/checkout- Authenticate using the Cloudsmith Action: Add the following step to your job. It will handle the entire OIDC token exchange process automatically and configure the Cloudsmith CLI for any subsequent steps.
- name: Authenticate with Cloudsmith via OIDC
  uses: cloudsmith-io/[email protected]
  with:
    oidc-namespace: 'your-workspace' # Your Cloudsmith workspace
    oidc-service-slug: 'your-service-account-slug' # Your Cloudsmith service account slug
    oidc-auth-only: 'true' # Ensures the action only performs authentication
The action fetches the OIDC token from GitHub, exchanges it for a Cloudsmith token, and sets the CLOUDSMITH_API_KEY environment variable for the rest of the job. Finally, add any extra step for your workflow and trigger a build in GitHub Actions.
Example GitHub Actions Workflow
Below is a full example of pushing a package to Cloudsmith in GitHub Actions using the modern OIDC authentication method.
name: Push a Debian package to Cloudsmith with OIDC
on:
  push:
    branches: [ main ]

permissions:
  id-token: write # Required to request the OIDC token from GitHub
  contents: read  # Required for actions/checkout to read the repository

jobs:
  push:
    runs-on: ubuntu-latest
    name: Push a Debian package to Cloudsmith using OIDC
    steps:
      - name: Check out code
        uses: actions/checkout@v4

      # This step handles the entire OIDC authentication flow automatically.
      # It gets a token from GitHub and exchanges it for a Cloudsmith token.
      - name: Authenticate with Cloudsmith via OIDC
        uses: cloudsmith-io/[email protected]
        with:
          oidc-namespace: 'WORKSPACE'             # Replace with your Cloudsmith workspace
          oidc-service-slug: 'SERVICE_ACCOUNT_SLUG' # Replace with your service account slug
          oidc-auth-only: 'false'
      - name: Push package to Cloudsmith
        run: |
          cloudsmith push deb WORKSPACE/REPOSITORY/DISTRO/VERSION PACKAGE_NAME-PACKAGE_VERSION.PACKAGE_ARCH.deb
Updated 6 months ago