npm Registry
Cloudsmith provides public & private registries for npm (JavaScript)

npm is an extremely popular package manager for the JavaScript, and is used for creating and using packaged Node.js modules. A public index of packages is available from npm, inc. on npmjs.org. npm, Inc also develop and maintain the official npm client, ecosystem and tooling.
For more information on npm, please see:
- npm: The official website for npm
Cloudsmith is proud to support fully-featured registries for managing your own private and public npm packages. We provide a high-level of compatibility with the official npmjs API meaning you can use the official CLI client - npm - for installing, managing, and publishing npm packages to Cloudsmith. Or if you prefer you can use the Cloudsmith UI, API or CLI - cloudsmith.
The Cloudsmith npm registry has been fully tested with the following:
npmCLI version: v6.4.1nodeversion: v6.11.3yarnversion: v1.9.4
It is likely that it will work for other environments, including older and more recent versions. If you encounter any issues please let us know.
In the following examples:
| Identifier | Description |
|---|---|
| OWNER | Your Cloudsmith account name or organization name (namespace) |
| REPOSITORY | Your Cloudsmith Repository name (also called "slug") |
| TOKEN | Your Cloudsmith Entitlement Token (see Entitlements for more details) |
| USERNAME | Your Cloudsmith username |
| PASSWORD | Your Cloudsmith password |
| API-KEY | Your Cloudsmith API Key |
| PACKAGE_NAME | The name of your package |
| PACKAGE_VERSION | The version number of your package |
| TAG | The name of an optional npm distribution tag |
Upload a Package
Publish via npm
You can publish your npm packages to a Cloudsmith-based npm registry via the native npm tooling.
Setup
The endpoint for the native npm API is:
https://npm.cloudsmith.io/OWNER/REPOSITORY/
To authenticate for native publishing, you can either use npm login or create an npmrc file (in your $HOME or in the project directory)
NPM Version 9 introduced a change which consolidated the legacy authentication types.
Please see the official NPM release notes here for further details.
Use npm login:
npm login --registry=https://npm.cloudsmith.io/OWNER/REPOSITORY/
Username: USERNAME
Password: API-KEY
Email: YOUR-EMAIL-ADDRESS
npm login --auth-type=legacy --registry=https://npm.cloudsmith.io/OWNER/REPOSITORY/
Username: USERNAME
Password: API-KEY
Email: YOUR-EMAIL-ADDRESS
Or create an .npmrc file with the following:
registry=https://npm.cloudsmith.io/OWNER/REPOSITORY/
//npm.cloudsmith.io/OWNER/REPOSITORY/:_authToken=API-KEY
Publish
Once you have set up the registry, you can then publish from your project directory using npm publish:
npm publish --registry=https://npm.cloudsmith.io/OWNER/REPOSITORY/
For more details on npm publish see the official npm documentation. (external link)
Upload via the Cloudsmith CLI
For full details of how to install and setup the Cloudsmith CLI, see Command Line Interface.
To upload via the Cloudsmith CLI / API, you'll need to generate your package first. You can do this with:
npm pack
This will generate a tarball file (.tgz) like your-package-1.2.3.tgz that you can upload.
This assumes that you've created a
project.jsonfile for your project. Please see the official npmjs [package.json reference] (https://docs.npmjs.com/files/package.json) (external link) for more information.
The command to upload an npm package via the Cloudsmith CLI is:
cloudsmith push npm OWNER/REPOSITORY PACKAGE_NAME-PACKAGE_VERSION.tgz
Example:
cloudsmith push npm your-account/your-repo cloudsmithjs-1.0.0.tgz
Upload via Cloudsmith Website
Please see Upload a Package for details of how to upload via the Website UI.
Scoped Packages
Using a package scope provides a different namespace to other similarly named packages to differentiate them.
To scope packages when publishing, add the scope to the name in your package.json file:
{
  "name": "@SCOPE/PACKAGE-NAME"
}
Replace @SCOPE with your own scope name
You can then publish the package directly using npm publish, or generate the package with npm pack and then push via the Cloudsmith CLI or Website UI
You can find further information in the npm documentation on scoped packages (external link)
Distribution Tags
Distribution tags allow npm packages to be tagged with a mnemonic that is associated with a specific package version.
Cloudsmith has full support for distribution tags and (mostly) follows the same rules for them as on npmjs.com:
- A specific tag can point at one version of a package only.
- A package version may have multiple unique tags.
- Unless specified otherwise, the default tag for the last package published is latest.
- When a package that is latest is deleted, the tag is moved to the next applicable version by semver.
- When a package is copied/moved to another repository, its tags are carried with it.
- If the latest package is moved/deleted, then existing packages are sorted via SemVer to determine the next latest.
You can inspect a package to see what tags it has:
npm dist-tags ls PACKAGE_NAME --registry=https://npm.cloudsmith.io/OWNER/REPOSITORY/
You can add tags to a package:
npm dist-tags add PACKAGE_NAME@PACKAGE_VERSION TAG -
-registry=https://npm.cloudsmith.io/OWNER/REPOSITORY/
You can also remove tags from a package:
npm dist-tags rm PACKAGE_NAME TAG --registry=https://npm.cloudsmith.io/OWNER/REPOSITORY/
You can find out more about distribution tags in the npm documentation (external link).
Download / Install a Package
Setup
You can configure npm to use a Cloudsmith-based npm registry in one of two ways:
- Specify the registry per user, as the global default or per-project
- Provide the registry URL when executing
npmcommands
Public Registries
To use/set the registry as the default for your user, execute the following:
npm config set registry https://npm.cloudsmith.io/OWNER/REPOSITORY/
You can set it globally (with permissions) by using the -g argument.
Setting the registry globally will impact all npm commands unless they explicitly override the registry.
You can also add the registry directly to your user or project .npmrc file as follows:
registry=https://npm.cloudsmith.io/OWNER/REPOSITORY/
Alternatively, you can specify the registry each time you execute npm commands, such as:
npm install PACKAGE_NAME --registry=https://npm.cloudsmith.io/OWNER/REPOSITORY/
Private Registries
Private Cloudsmith repositories require authentication. You can choose between two types of authentication, Entitlement Token Authentication or HTTP Basic Authentication. The setup method will differ depending on what authentication type you choose to use.
Entitlement Tokens, User Credentials and API-Keys should be treated as secrets, and you should ensure that you do not commit them in configurations files along with source code or expose them in any logs.
To set up the registry with authentication, add the one of the following to your user or project .npmrc file:
registry=https://npm.cloudsmith.io/OWNER/REPOSITORY/
//npm.cloudsmith.io/OWNER/REPOSITORY/:_authToken=TOKEN
registry=https://npm.cloudsmith.io/OWNER/REPOSITORY/
//npm.cloudsmith.io/OWNER/REPOSITORY/:username=USERNAME
//npm.cloudsmith.io/OWNER/REPOSITORY/:_password=PASSWORD
registry=https://npm.cloudsmith.io/OWNER/REPOSITORY/
//npm.cloudsmith.io/OWNER/REPOSITORY/:_authToken=API-KEY
registry=https://npm.cloudsmith.io/OWNER/REPOSITORY/
//npm.cloudsmith.io/OWNER/REPOSITORY/:username=token
//npm.cloudsmith.io/OWNER/REPOSITORY/:_password=TOKEN
NOTE
If using HTTP Basic Authentication with your Cloudsmith username and password or with a Cloudsmith Entitlement Token, you must encode your password or token in base64
Install a Package
Once you have an authentication method configured, you can then install packages using:
npm install PACKAGE_NAME
If you have added tags to the package, then these tags can be used as an alternative to the package version when installing packages, such as:
npm install PACKAGE_NAME@TAG --registry=https://npm.cloudsmith.io/OWNER/REPOSITORY/
Scoped Registries
Using a registry scope tells npm to route installs for packages in that scope to Cloudsmith.
You can set it via the command-line using:
npm config set '@SCOPE:registry' https://npm.cloudsmith.io/OWNER/REPOSITORY/
You can also set it directly in your user or project .npmrc file:
@SCOPE:registry=https://npm.cloudsmith.io/OWNER/REPOSITORY/
Installing packages with a scope then requires putting the scope before the name:
npm install @SCOPE/PACKAGE_NAME
Yarn Compatibility
To ensure Yarn compatibility, enable always-auth by adding it to your user or project .npmrc file:
always-auth
Transparent Upstream Proxying
Cloudsmith supports transparent proxying of install requests to/from npmjs.com.
When enabled, requests for packages that don't exist in the registry will be automatically proxied.
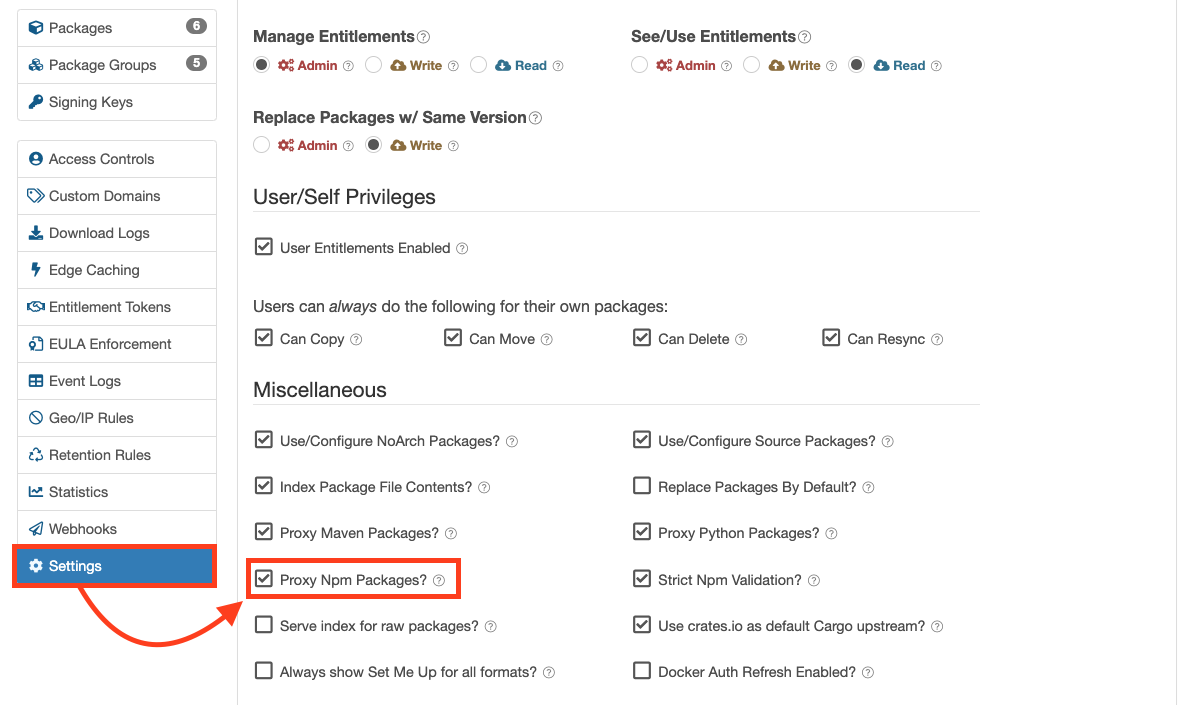
With admin access to the registry, you can disable transparent upstream proxying by going to the settings page, unchecking the Proxy npm Packages? option, and then clicking Update:

npm proxy settings
If transparent upstream proxying is disabled for the registry then you will need to fetch all dependencies of your packages manually. These can then be published into the registry, or you can bundle them with bundleDependencies.
Security Auditing
Cloudsmith supports proxying of npm audit requests to detect vulnerabilities in dependencies, you just need to execute:
npm audit
Note
To use
npm audit, you must authenticate using a Cloudsmith API-Key, not an Entitlement Token.
You can find out more about security auditing in the npm documentation (external link).
Current Limitations
The Cloudsmith npm registry implementation currently has the following limitations:
- The maximum size per-package file is currently limited to 100MiB (100 megabytes), but only when utilising the native npm-cli for publishing. If uploading using the cloudsmith-cli, then the absolute maximum size per-package file limit will be the standard 5GiB.
Cloudsmith is unlikely to support the following (out-of-scope):
- Profile, user, team or org commands; use the
cloudsmith-cliinstead. npm accessand visibility; packages follow repository visibility.- Viewing and changing collaborators of packages via 'npm owner'.
- Creating tokens via
npm token; use thecloudsmith-clior UI instead. - Changes stream to implement followers; webhooks are a functional alternative.
Additionally, any search terms used are not passed to upstream repositories and are handled by Cloudsmith. Search results from upstream repositories are not blended into results; only Cloudsmith results are shown.
Security Scanning
Supported
Please see our Security Scanning documentation for further information.
Upstream Proxying / Caching
Configurable Proxying Caching
You can configure upstream NPM repositories you wish to use as additional package sources for your Cloudsmith repository. You can also choose to cache any requested packages for future use.
Please see our Upstream Proxying documentation for further instructions
Key Signing Support
GPG
Troubleshooting
Please see the Troubleshooting page for further help and information.
Updated 7 months ago

