Azure DevOps
Effortlessly integrate Cloudsmith with Azure DevOps to securely manage artifacts and automate deployments.

Introduction
Integrate Cloudsmith with Azure DevOps to automate the management of your artifacts securely and efficiently. This guide will help you set up Azure DevOps pipelines to interact directly with Cloudsmith repositories, with options for both API Key and OIDC authentication.
What You’ll Need
Before getting started, you need to have the following prerequisites:
- An Azure DevOps account with pipeline permissions, which can be set up by following the steps in the Azure DevOps documentation.
- A Cloudsmith account, which can be set up by following the steps in the Cloudsmith documentation.
- Azure Entra (formerly Azure Active Directory) App registration capabilities if using OIDC.
Integration Features
- Automatic Cloudsmith CLI Setup: Install and configure Cloudsmith CLI in your ADO pipeline.
- Flexible Authentication: Choose between API Key and OIDC authentication.
- Cross-Platform Compatibility: Works on Windows, Ubuntu, and Mac ADO agents.
Step-by-Step Guide
Step 1: Set Up an Azure AD Application in Azure Entra (for OIDC Authentication)
To enable OIDC authentication, create an Azure AD (Azure Entra) application that will allow Azure DevOps to interact securely with Cloudsmith.
- Navigate to Azure Entra Applications:
- Go to Azure Portal.
- Select Azure Active Directory/Entra from the menu.
- Choose App registrations and click New registration.
- Register the Application:
- Enter a Name (e.g., “Cloudsmith Integration”).
- For Supported account types, select Accounts in this organizational directory only.
- Click Register.
- Capture Key Details:
- After registration, note the Application (client) ID and Directory (tenant) ID. These will be needed in the pipeline configuration as clientId and tenantId, respectively.
- Create a Client Secret:
- In your registered app, navigate to Certificates & secrets.
- Under Client secrets, click New client secret.
- Add a Description (e.g., “Cloudsmith Secret”) and set an expiration.
- Click Add and copy the Value. This will be your clientSecret.
- Configure API Permissions for the Azure Entra App Registration:
- In your Azure Entra App Registration, navigate to the API Permissions blade.
- Click on Add a permission.
- Under Microsoft APIs, select Microsoft Graph.
- Choose Delegated permissions and select User.Read.
- Click Add permissions.
- After adding the permission, click on Grant admin consent for the organization to ensure this permission is granted for all users in the directory.
- Set App ID URI:
- Navigate to Expose an API in the application’s settings.
- Click Set to define an Application ID URI. You can use the default URI or set one on your own.
- Copy the URI.
Note: This URI will be used as the appIdUri in the pipeline configuration with /.default appended to the URI. Example: api://mydomain/myapp/.default.
Step 2: Install the Cloudsmith CLI Extension in Azure DevOps
Go to the Azure DevOps Marketplace. Search for Cloudsmith CLI Setup & Authenticate and install it in your DevOps organization.
Step 3: Add the Cloudsmith CLI Setup & Authenticate Task in Your Pipeline
- In your Azure DevOps project, navigate to Pipelines and open the pipeline where you want to integrate the Cloudsmith CLI.
- In the pipeline editor, add the Cloudsmith CLI Setup & Authenticate task.
- To use a specific CLI version, set cliVersion in your pipeline. Leave it blank to use the latest.
- Configure the task based on your preferred authentication method:
- For API Key Authentication: Enter your Cloudsmith API key.(Check step 3 for more explanation)
- For OIDC Authentication: Enter the required OIDC Namespace and OIDC Service Account Slug along with the Client ID, Client Secret, Tenant ID, and App ID URI as needed.(Check step 3 for more explanation)
Step 4: Configure Authentication in Your Azure DevOps Pipeline
This integration supports both API Key and OIDC authentication.
API Key Authentication
- Set authMethod to 'apiKey'.
- Provide CLOUDSMITH_API_KEY as a secret variable in your pipeline configuration.
Example configuration:
cliVersion: '1.3.1'  # Example CLI version
authMethod: 'apiKey'
apiKey: '$(CLOUDSMITH_API_KEY)'
OIDC Authentication
To set up OIDC authentication, configure the following parameters:
- clientId: The Application (client) ID from Azure AD.
- clientSecret: The Client Secret created in Azure AD.
- tenantId: The Directory (tenant) ID from Azure AD.
- appIdUri: The Application ID URI from Azure AD.
- oidcNamespace: Your Cloudsmith organization namespace.
- oidcServiceSlug: The specific Cloudsmith service account slug.
Example configuration:
cliVersion: '1.3.1'  # Example CLI version
authMethod: 'oidc'
clientId: '$(YOUR_CLIENT_ID)'
clientSecret: '$(YOUR_CLIENT_SECRET)'
tenantId: '$(YOUR_TENANT_ID)'
appIdUri: '$(YOUR_APP_ID_URI)'
oidcNamespace: '$(YOUR_CLOUDSMITH_NAMESPACE)'
oidcServiceSlug: '$(YOUR_SERVICE_SLUG)'
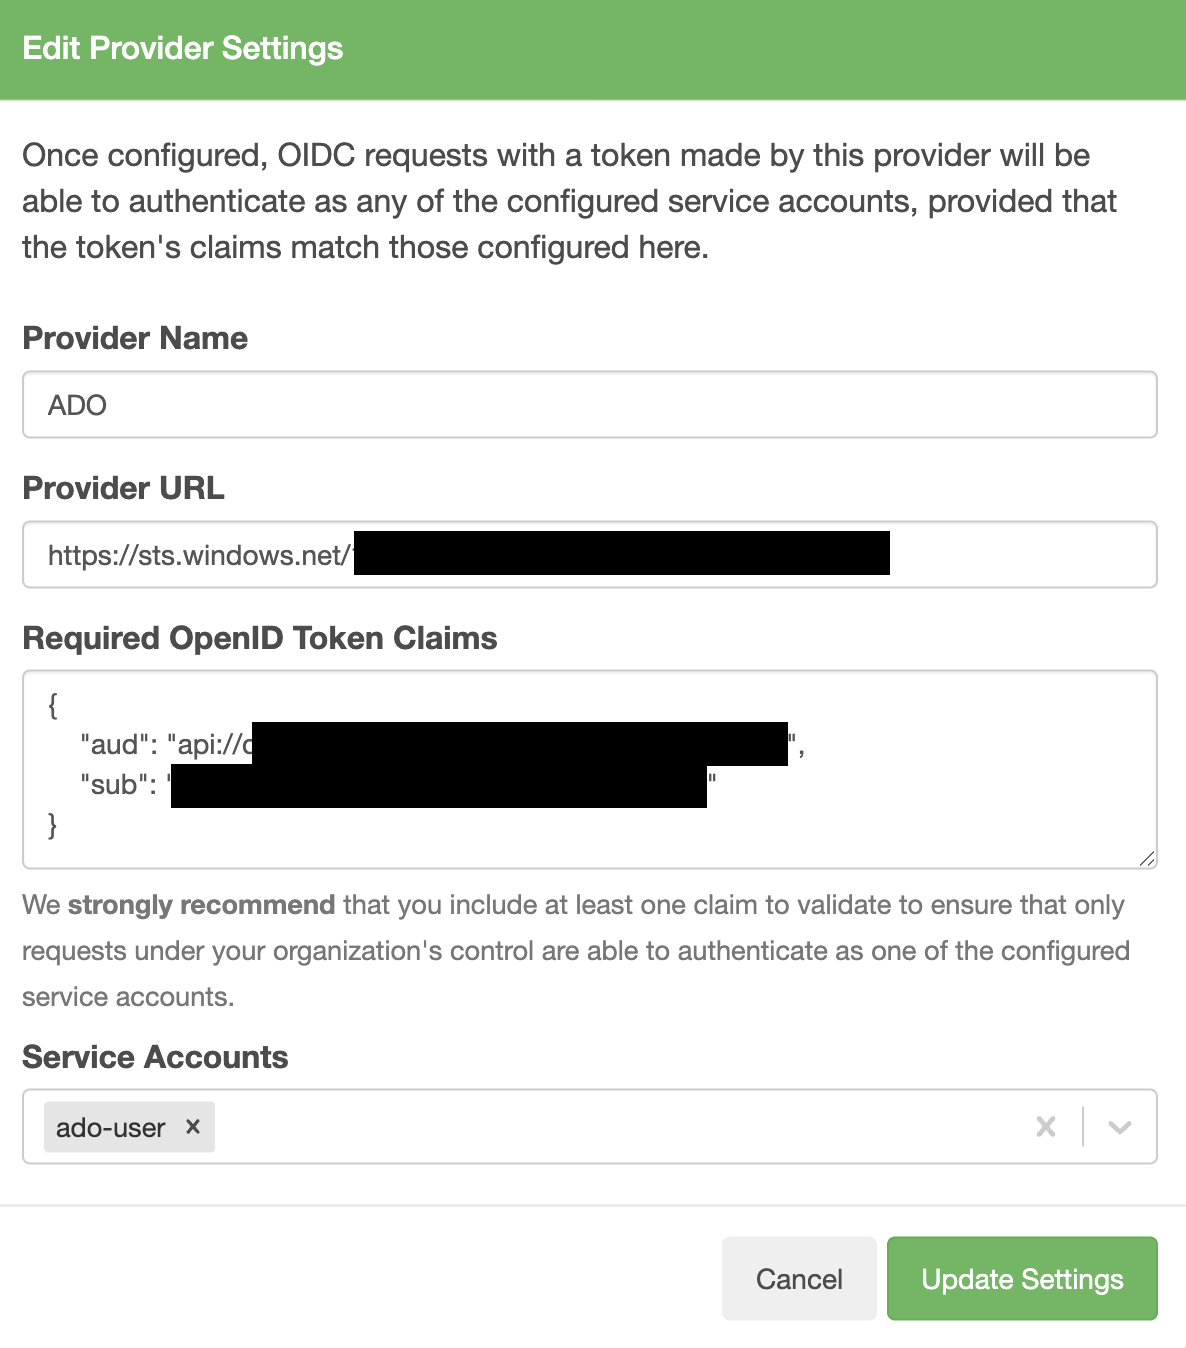
Step 5: Create an OIDC Provider Configuration in Cloudsmith(In case of OIDC)
- In your Cloudsmith account, navigate to Settings and select OpenID Connect (OIDC).
- Click create and fill out the following fields:
- Provider Name: Enter a unique name for your provider (e.g., “ado”).
- Provider URL: Set this to https://sts.windows.net/your-tenant-id, replacing your-tenant-id with your Azure AD Tenant ID.
- Required OpenID Token Claims: Ensure at least aud claim is configured. You need to include:
Replace <appIdUri_value> with the Application ID URI of your Azure AD application.
{ "aud": "<appIdUri_value>" } - Under Service Accounts, select the appropriate service account(s) that this provider can authenticate with. For example, you might select a service account like “ado-user” as shown in the image above.
- Click Create Settings to save the configuration.
This configuration allows Cloudsmith to authenticate requests from Azure DevOps using OIDC, provided the token claims match.

Step 6: Verify CLI Installation and Authentication
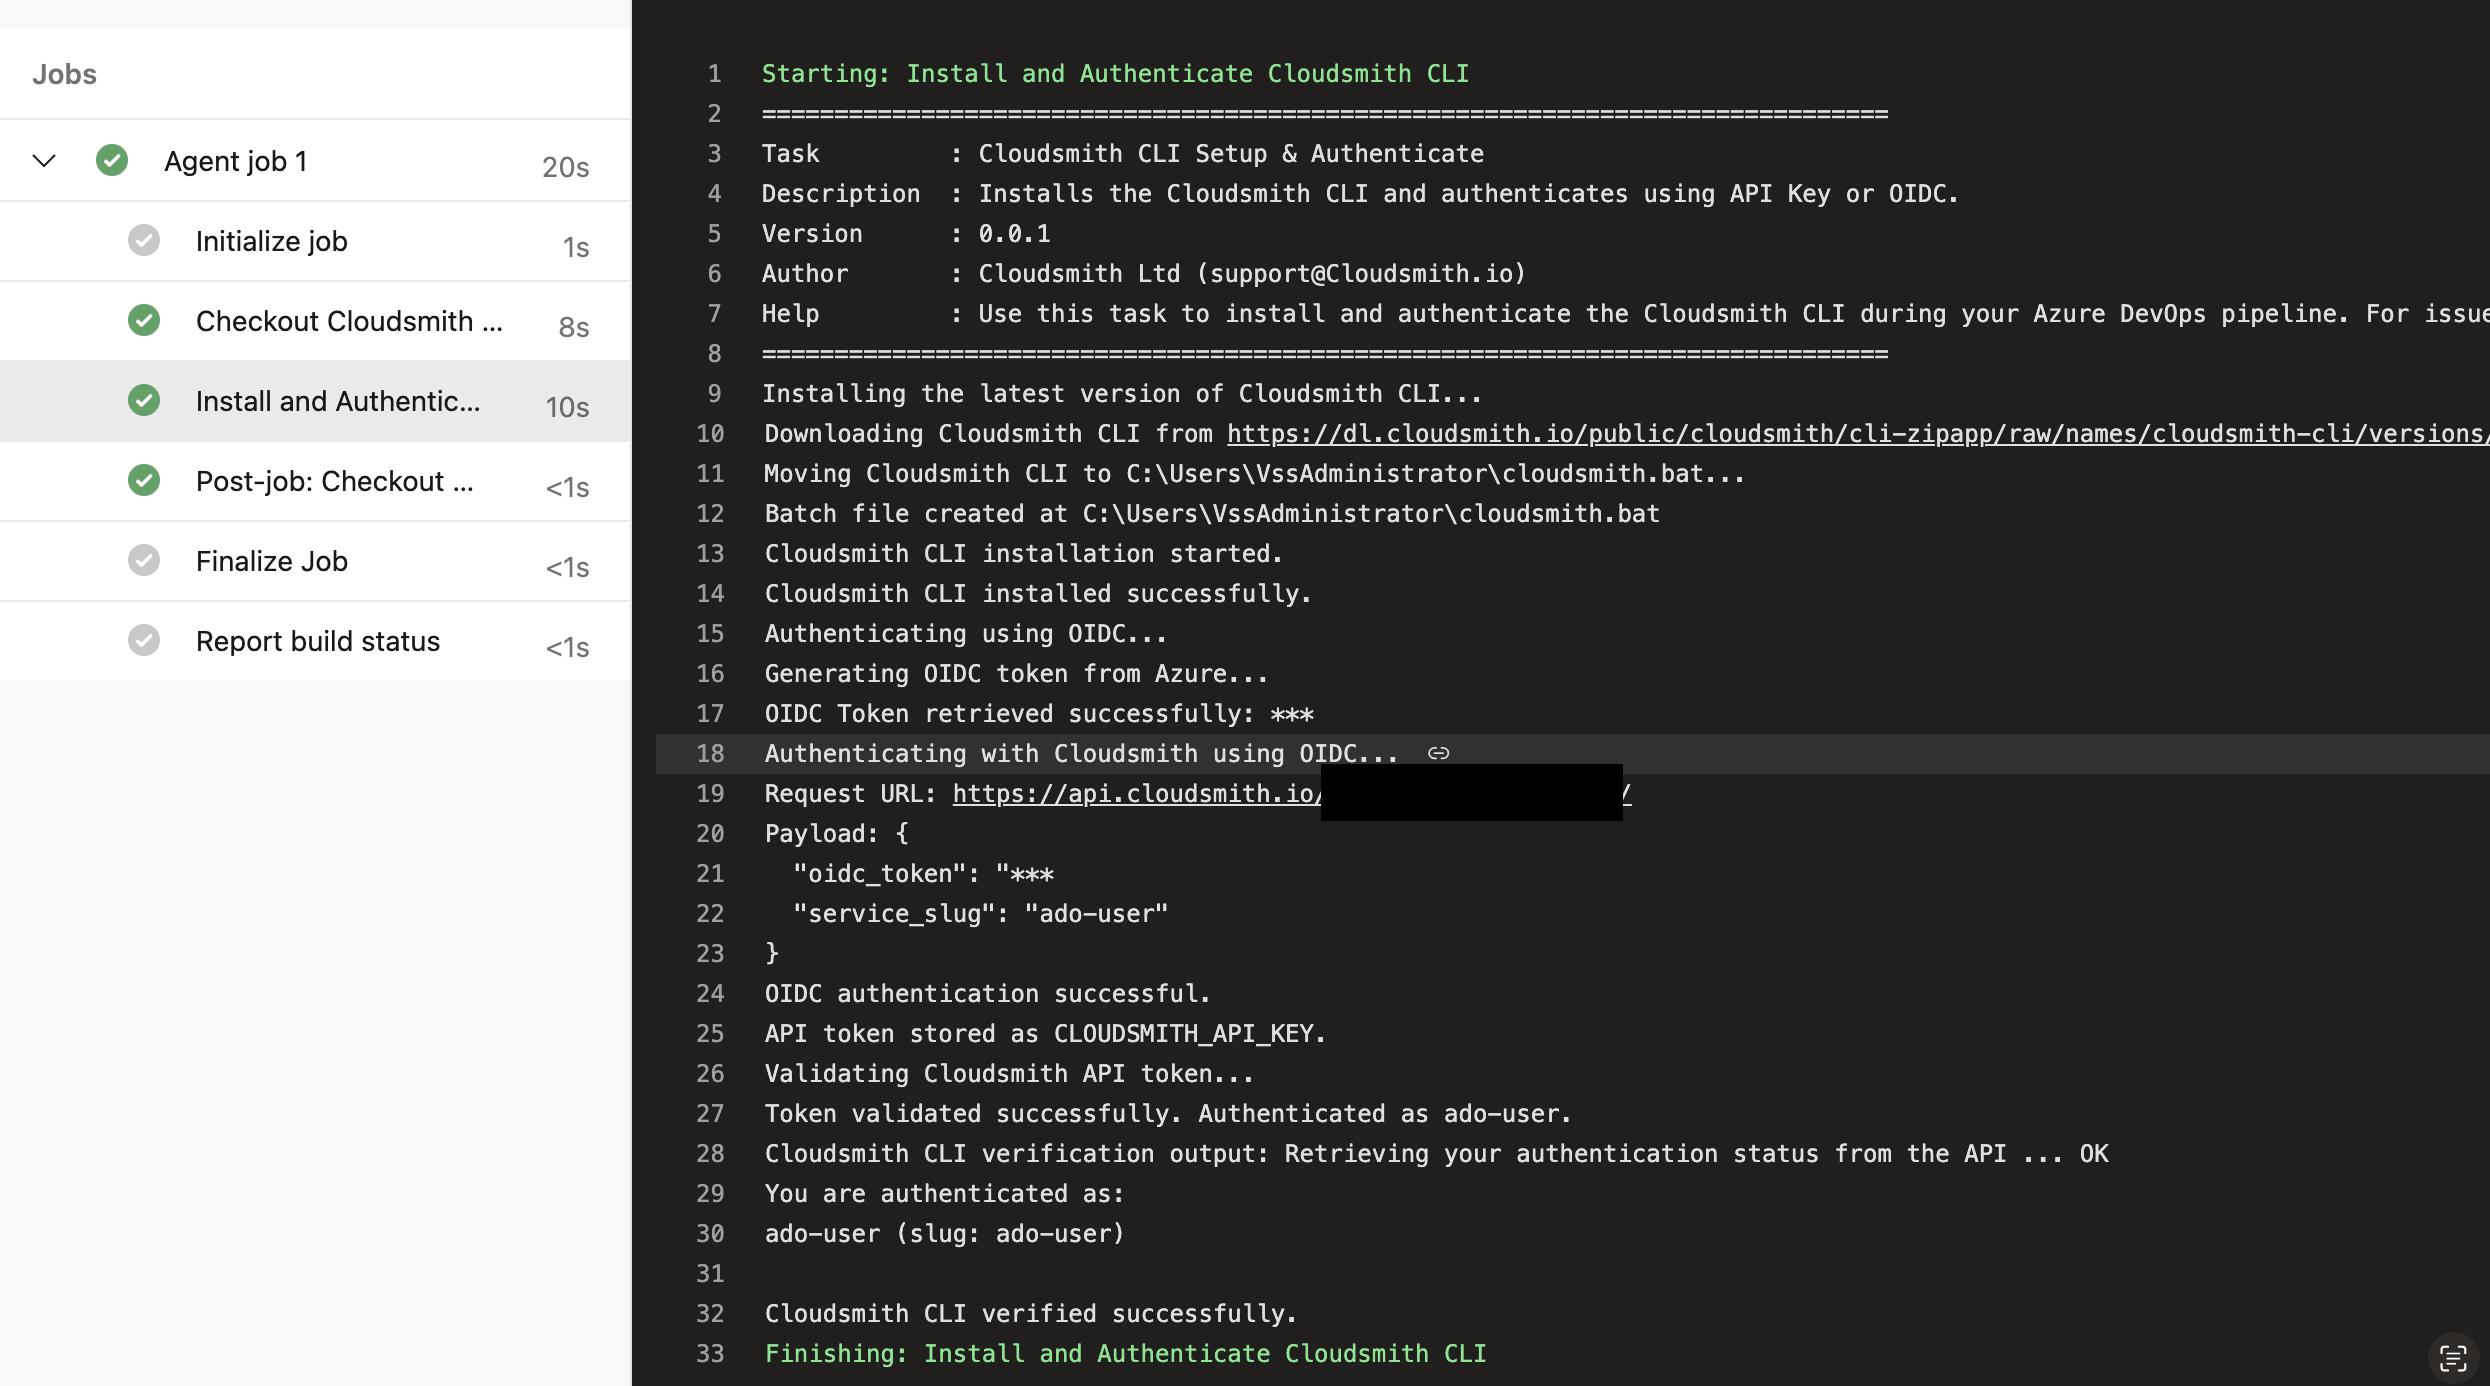
Save and run your pipeline to complete the setup. After running the pipeline, the extension will install the Cloudsmith CLI, authenticate based on the chosen method, and validate the setup by running cloudsmith whoami. You can check the logs to see the authentication details.

Start Using Cloudsmith CLI Seamlessly in Your Pipeline
This example YAML configuration demonstrates how to set up an Azure DevOps pipeline that uses the Cloudsmith CLI extension with OIDC authentication to push a package to Cloudsmith.
trigger:
  branches:
    include:
      - main  # Trigger pipeline on changes to the main branch

pool:
  vmImage: 'ubuntu-latest'

steps:
  - task: CloudsmithCliSetupAndAuthenticate
    inputs:
      authMethod: 'oidc'                     # Use OIDC authentication
      clientId: '$(your-client-id)'           # Client ID from your Azure Entra app registration
      clientSecret: '$(your-client-secret)'   # Client Secret from your Azure Entra app registration
      appIdUri: '$(your-app-id-uri)'          # Application ID URI of your Azure Entra app
      tenantId: '$(your-tenant-id)'           # Tenant ID of your Azure AD tenant
      oidcNamespace: '$(your-namespace)'      # OIDC namespace for Cloudsmith
      oidcServiceSlug: '$(your-service-slug)' # Service account slug for Cloudsmith
      cliVersion: 'latest'                    # Specify CLI version (leave empty for latest)

  # Task to push a raw package to Cloudsmith
  - script: |
     	cloudsmith push raw $(CLOUDSMITH_ORG)/$(CLOUDSMITH_REPO) my-package.zip
    displayName: 'Push package to Cloudsmith
With all the configurations in place, you’re now set up to use Cloudsmith CLI commands in your pipeline without additional setup steps. This means you can perform any Cloudsmith-related operations—such as pushing packages, pulling packages, or managing repositories—directly from the pipeline.
Ensure that the above configuration steps run on the same pipeline runner along with the Cloudsmith CLI tasks.
Best Practices
- Use OIDC: Use OIDC authentication instead of API keys for enhanced security.
- Use Secure Variables: Ensure all sensitive information, like clientId, clientSecret, apiKey, and tenantId, are stored securely as secrets in Azure DevOps rather than hardcoded in your pipeline.
- Use Latest CLI Versions: Keep the Cloudsmith CLI updated to leverage the latest features and security patches. If specific versions are required, specify them explicitly in your configuration.
Troubleshooting
- Authentication Issues:
- Ensure all authentication variables are correctly set and valid for either API Key or OIDC.
- Verify that the correct service account is selected in Cloudsmith for the OIDC provider.
- Permission Errors: Verify that the ADO pipeline worker has appropriate permissions to download and install the CLI on the agent(in case of self-hosted agents).
- OIDC authentication failures: Ensure the Provider URL and aud claim are set correctly, and verify all Azure Entra app configurations.
- PATH Issues with Cloudsmith CLI: Ensure you’re using the same runner for all steps, as switching runners may lose CLI installation and configuration.
- OIDC Authentication Failures (401/422 Errors):
- Ensure that the Provider URL is set to https://sts.windows.net/<TENANT_ID> in Cloudsmith and that it matches the configuration in Azure AD.
- Double-check the aud (audience) claim in the token claims section to ensure it matches the Application ID URI configured in Azure Entra (Azure AD).
- If you encounter invalid_scope errors, make sure the appIdUri is correct.
- Ensure that the application is properly registered in Azure Entra (Azure AD) with the correct permissions.
- Client ID, Client Secret, and Tenant ID, verify that these values are correctly entered in your pipeline configuration. Even a minor typo can result in failed authentication.
Updated about 1 month ago
